

6.34 How to Assign and Configure Dejavoo License in SambaPOS
This detailed step-by-step guide will walk you through assigning and configuring the Dejavoo payment module in SambaPOS.
Follow each section carefully to ensure proper setup.
Before Starting;
To use SambaPOS Dejavoo Integration, you must upgrade your SambaPOS version to at least 5.7.22
If you are using a lower version, please upgrade as soon as possible.
Step 1: Assign a Dejavoo License
1.1. Log in to the SambaPOS License Control Panel (CP)
– Open a browser and go to https://cp.sambapos.com/signin
– Enter your credentials (username and password) to log in.
1.2. Assign the Dejavoo License
– Navigate to the License Management section.
– Locate the option for Dejavoo license and assign it to your account or demo account.
1.3. Important Notes:
– The Dejavoo license is free of charge, so assigning it will not incur additional fees.
– Verify that the license is assigned correctly before proceeding to the next step.
1.4. Verify License Assignment:
– Once assigned, check your active licenses to confirm the Dejavoo license is listed.
– If the license does not appear, refresh the page or contact SambaPOS support.
Step 2: Locate the Payment Controller Folder
2.1. Find the SambaPOS Installation Root Folder:
– The default installation location for SambaPOS is typically:
C:\Program Files\SambaPOS\
Alternatively, if a custom location was chosen during installation, find the corresponding directory (e.g., C:\SambaPOS\).
2.2. Open the Payment Controller Folder:
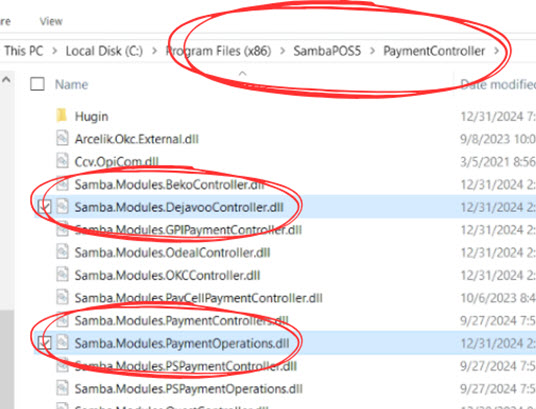
– In the root folder, locate and open the subfolder named Payment Controllers.
Step 3: Identify and Copy the Required DLL Files
3.1. Locate the Following Two DLL Files:
– Samba.Modules.DejavooController.dll
– Samba.Modules.PaymentOperations.dll
3.2. Verify File Names Carefully:
– Ensure you select only the two DLL files mentioned above. Selecting incorrect files may prevent SambaPOS from functioning properly.
3.3. Copy the Files:
– Highlight the two required files.
– Right-click and select Copy, or use the keyboard shortcut Ctrl+C.
Step 4: Paste the DLL Files to the Root Folder
4.1. Navigate Back to the Root Folder:
– Go back to the main SambaPOS root directory, where you initially located the Payment Controllers folder.
4.2. Paste the Files:
– Right-click in the root folder and select Paste, or use the keyboard shortcut Ctrl+V.
4.3. Critical Reminder:
– Do NOT copy any additional files from the Payment Controllers folder. Copying incorrect files may cause issues with SambaPOS loading or functionality.
Step 5. Setting Up the Custom Navigation Screen
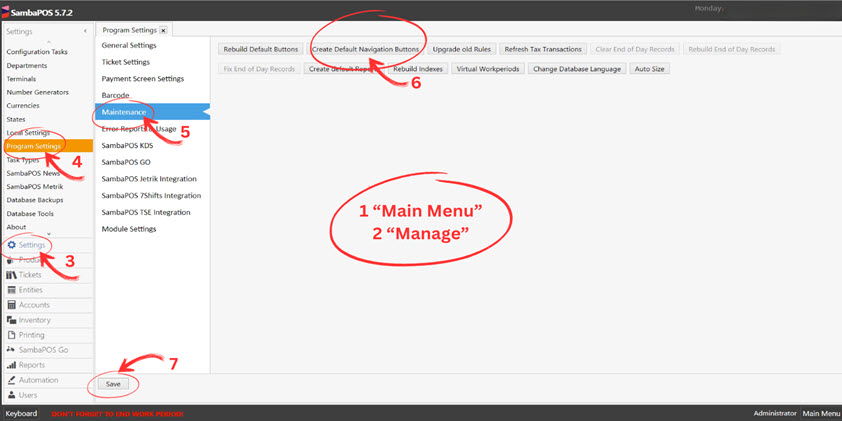
Go to
Main Menu > Manage > Settings > Program Settings > Maintenance.Click
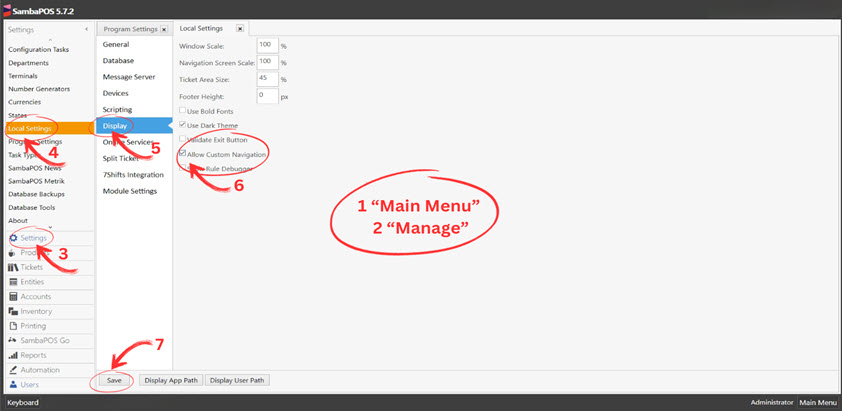
Create Default Navigation Buttonsand save your changes.Enable custom navigation in
Main Menu > Manage > Settings > Local Settings > Display.
Step 6. Creating an Automation Command
Navigate to Main Menu > Manage > Automation > Automation Commands > Here click onAdd Automation Command
6.1. General Settings Section;
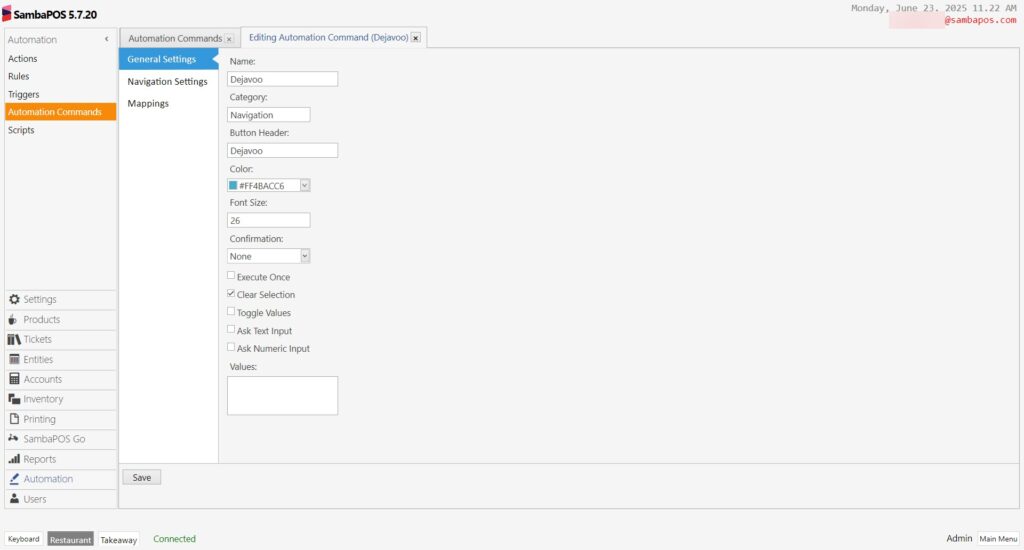
Name: Dejavoo
Category: Navigation
Button Header: Dejavoo
Color: [Choose desired color]
Clear Selection: Enabled
6.2. Navigation Settings;
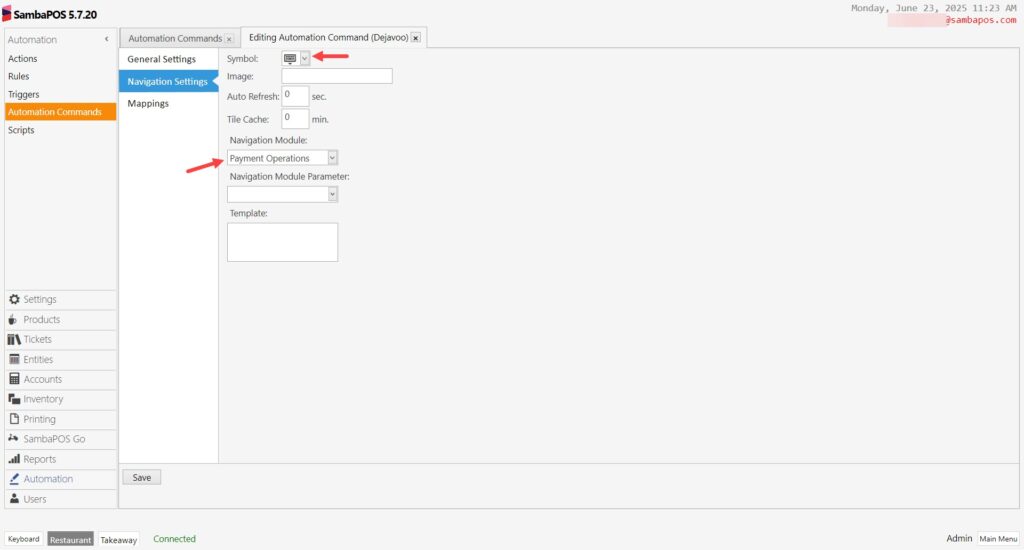
Symbol: [Choose a symbol]
Navigation Module: Payment Operations
6.3. Mappings Section;
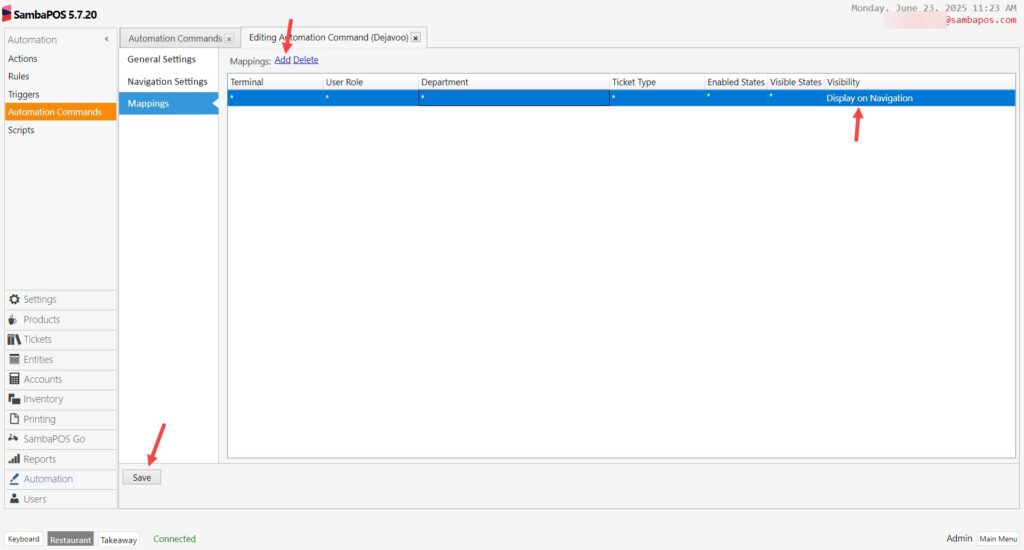
Add a new row in Mappings with Visibility: Display on Navigation.
Save your changes.
Step 7. Restart SambaPOS V5 Pro
After completing the setup, restart SambaPOS V5 Pro to apply changes.
7.1. Close SambaPOS:
– Ensure SambaPOS is completely closed. Use Task Manager to confirm no background processes are running.
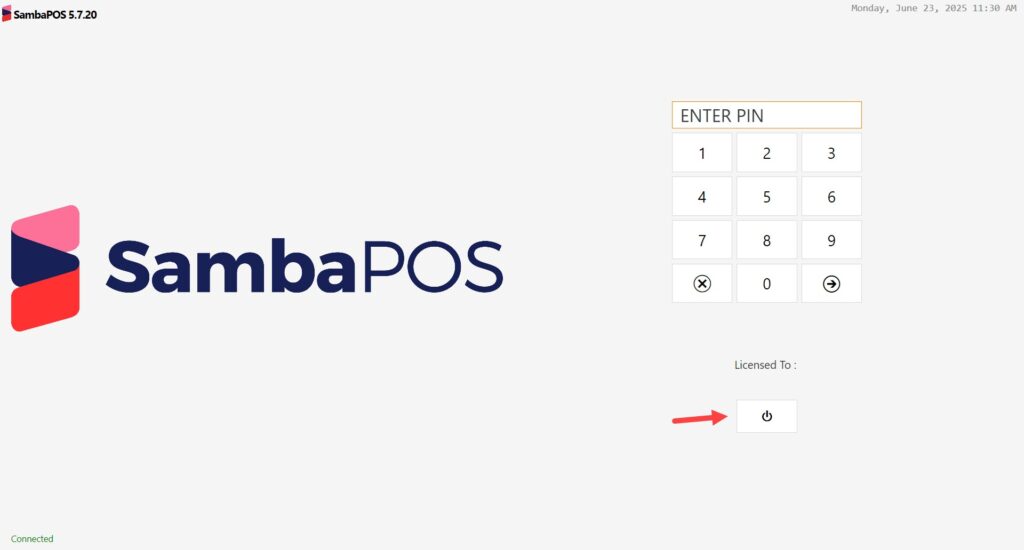
7.2. Restart SambaPOS:
– Relaunch SambaPOS to apply the changes made during the DLL file configuration.
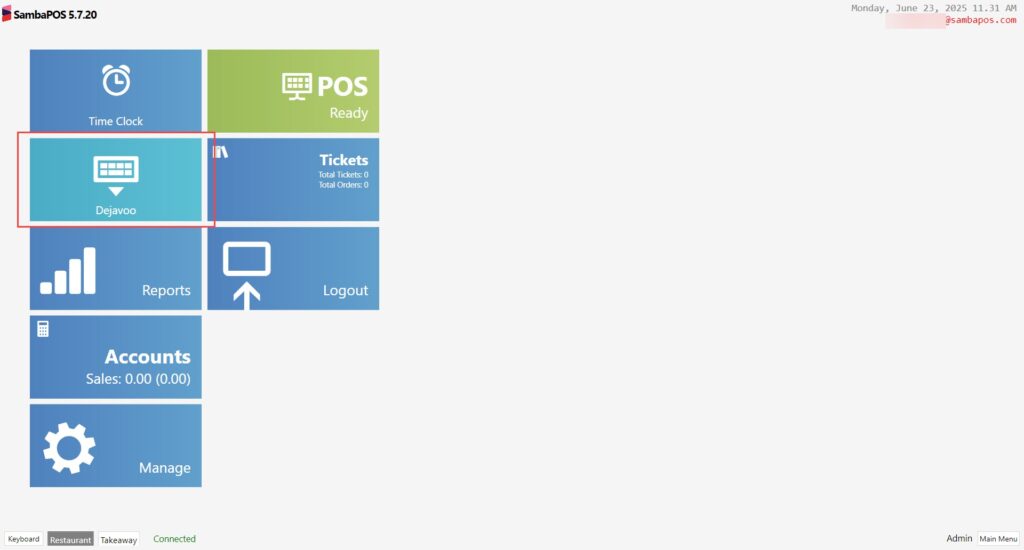
Step 8: Obtain Dejavoo Local Settings
8.1. Log in to the ISOPays Portal:
– Open a browser and go tohttps://portal.ipospays.com/auth/login
– Use your credentials to log in to the portal.
8.2. Activate Spin Cloud Mode:
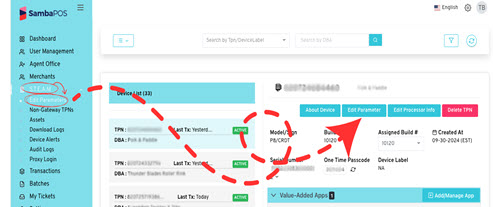
– In the portal, from the left navigateion bar, go to the S.T.E.A.M..
– S.T.E.A.M. > Edit Parameters.
– Select the device from the device list.
– Once the correct device has been selected, select Edit Parameters from the list above the device’s information.
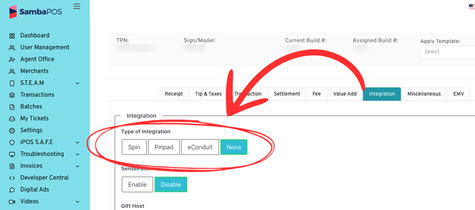
– Under Edit Parameters > Integration and turn on SPIN
8.3. Gather Required Information:
– From the ISOPays portal, collect the following credentials:
TPN (Terminal Processing Number)
Register ID
Auth Key
Step 9: Access the Dejavoo Program Module Settings in SambaPOS
9.1 Navigate to the “Manage Settings” Section:
– Open the Settings tab in the SambaPOS interface from the left-hand menu.
9.2. Open Program Settings:
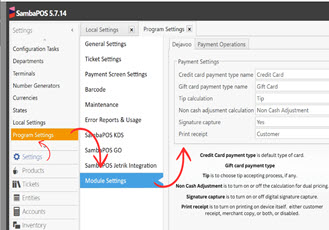
– Go to Settings > Program Settings.
9.3. Locate Module Settings:
– In the Settings > Program Settings > Module Settings, find the new module settings for Dejavoo.
9.4. Confirm Availability:
– If the Dejavoo settings do not appear, recheck the DLL file placement and licensing.
9.5. Save the Configuration:
– Double-check all fields for accuracy.
– Click Save to finalize the configuration.
Step 10: Access the Dejavoo Local Module Settings in SambaPOS
10.1. Go to the “Manage” Section:
– Return to the Settings tab in SambaPOS.
10.2. Open Local Settings:
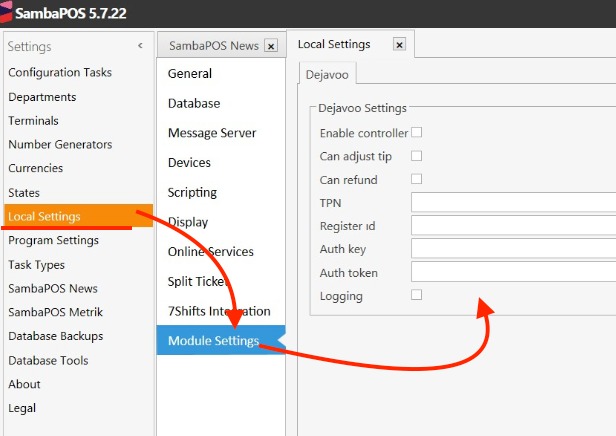
– Navigate to Settings > Local Settings.
10.3. Access Modules:
– Within Settings >Local Settings, click on the Modules tab.
– Locate the section for Dejavoo settings.
10.4. Confirm Availability:
– If the Dejavoo settings do not appear, recheck the DLL file placement and licensing
10.5. Enter Information into SambaPOS:
– Fill in the fields with the credentials from the ISOPays portal:
– Enable Controller: Enable this option.
– Can Adjust Tip: Check this box to allow tip adjustments on the terminal.
– Can Refund: Check this box to enable refund functionality.
– TPN: Enter the terminal processing number from ISOPays.
– Register ID: Enter the register ID from ISOPays.
– Auth Key: Enter the authentication key from ISOPays.
– Auth Token: Enter the authentication token from ISOPays.
– Logging: Enable this option if you need to track activity for debugging.
10.6. Save the Configuration:
– Double-check all fields for accuracy.
– Click Save to finalize the configuration.
– The Auth Token field became a mandatory field therefore you must fill it.
Step 11: Final Checks
11.1. Perform a Test Transaction:
– Process a test transaction to verify the Dejavoo module is working as intended.
– Look for error messages or incomplete configurations.
11.2. Verify Terminal Settings in ISOPays:
– Log back into the ISOPays portal and ensure the terminal settings align with the configuration in SambaPOS.